Inspiration & Advice
Whether you're all set to transform your entire workspace or seeking some inspiration for your setup in your own pase, we've got your back! Here on this page, you'll find free and friendly tips to spruce up and optimize your workroom. Got a unique layout or just feeling indecisive? Reach out to us, and we'll do our best to assist you. And hey, here's a fun fact: We're planning some future updates to make this page even more dynamic and engaging for better advice!
Things you did not know
A common mistake among content creators is believing that the quality of their audio and video recordings solely depends on the recording equipment. While this isn't entirely wrong, it's only half the battle in achieving optimal content quality. The remaining 50% lies in optimizing your workspace in acoustics and light. That's where this inspiration and advice page come into play. To grasp the concept fully, here's a favor we ask: Shift your perspective from viewing your workspace as just a room for content creation to seeing it as a professional recording studio, much like a record label or photographer's studio. Even if you're not primarily recording, say, as a blogger, these insights can help create a serene and inspiring environment for your work.
Even if you're just starting out and working with a limited budget, we highly recommend envisioning your future workspace and preparing for it. You can take gradual steps, noticing quality improvements as you make changes along the way. Patience and endurance, much like achieving virality, are key factors here.
Tip 1
Having your desk away from the wall, ideally in the middle of the room, helps minimize the direct reflections and standing waves that could affect the acoustics. Placing it against the wall might result in sound waves bouncing back and forth between the wall and your desk, creating unwanted resonance and affecting the quality of audio recordings or mixing.
I need some inspirational advice for my workspace
We know envisioning a workspace that aligns with your personal style isn't easy. Do you lean towards an industrial vibe or a cozy gaming setup? Perhaps you browse the internet for inspiration or prefer a unique approach. No matter your approach, it has to reflect you-your style. When you invest time, money, patience, and effort, we promise your space will resonate with the vibe of your favorite creator or the inspirational images below. Just keep in mind, you don't have to do it all at once, take it step by step.
The aim isn't to replicate these setups exactly. Instead, it's about finding your preferred style, selecting the elements you love, and maybe even blending a few together. That's where we will lend you a hand. Click on the banner below to explore a variety of workspace images. We hope this serves as a helpful guide on your journey! ;)
Let's begin envisioning and preparing your custom workspace!
Index the space you want to use. Is this going to be a full room, or just a part of it. is this a squared space, L-form, or is every wall completly diffrent. Are there windows in your room, and where does the daylight come in. These are all key factors to set up your workspace the correct way.
This is going to require some effort but this preperation will help you in the future when you start going to place everything. You need the messurements of your room. So grab a piece of paper and mesure every wall, where the door is, where the windows are. And make a basic blueprint of this. Don't worry, it does not have to be exact.
Are you recording video or audio in your workroom, then it is good to start testing the acoustics with your current setup. The easyest way is just to start talking a bit loud and see if the room has a resonance in it. If it is then the room is to empty. Remember that windows will reflect sound diffrently.
Ok so we have anothe rhomework assignment for you. Again grab a piece of paper and start making a list of the equipment you want to have in your workspace. Now what is not important is the estatics, but what is are bigger things like your chair or desk. If you want to reuse these then make sure to roughly get the mesurements of this equipment aswell.
We are almost there. Now stand in your room and try to devide in your mind diffrent spaces in your workspace. What we mean with this is, that perhaps your room is large enough to have a computer space seperate from a relax space or game space. Try to invision roughly where you want everything to stand.
The last step often is the most fun, and in this case it is. Remember how those epic creators you follow have such awsome workspaces. You think right now that money on expensive equipment was key to that. But its not. It has to do with synchronising the style of your room. Do you want a industrial workspace that looks more like a office space, or a neon bright game room with several relax spaces you can display your items in. It all can be done but for that you need to keep a single style line.
Below we have some inspirational workrooms that will help you along the way. notice how color, materials, and style are a key factor in the setup of a room. And this does not have to be expensive. But will require some work from you.
Ok your preperation is done, you have some messurements, a future vision on how you want your workspace to look, and some estimates where you want to have everything. So lets get to the next important advice. Setting up the acoustics.
Acoustic audio setup for your workspace
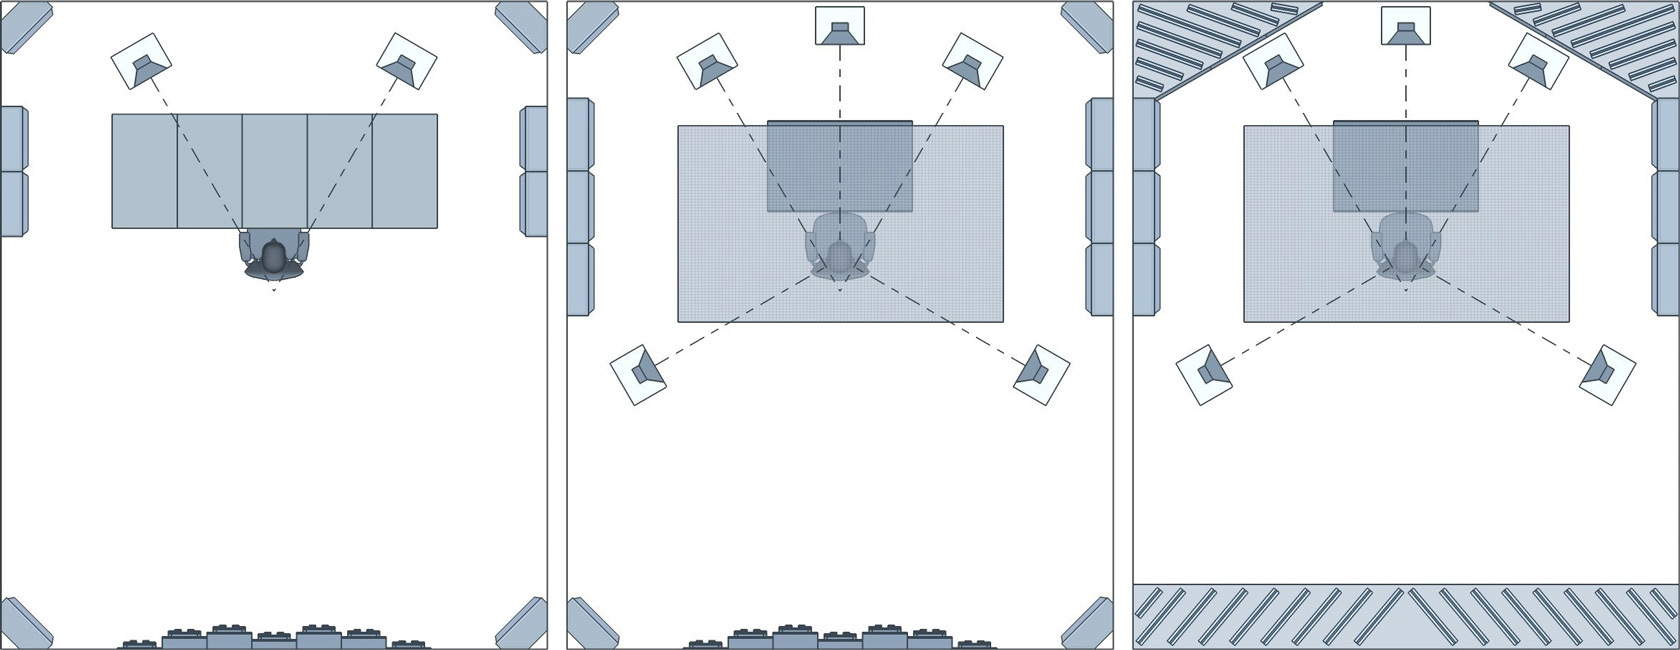
Below we display three diffrent audio setups. In these examples we go from basic in example A, where you can already make sigificant changes with a minimum budget. To example C, where you can make with some effort and budget almost a profesional recording studio. Now for conveniance we only took a rectangular room in this example just to show the importance of setting up your audio the correct way.

A lightly treated 2-channel mixing room with basic absorption and diffusion, typical in a project or home recording studio, can also serve as a hi-fi listening room. This setup displays only the minimum treatments necessary. While it's a good starting point, consider adding additional acoustic panels to control excessive liveliness and prevent potential flutter echo, especially in the rear half of the room.
A 5.1 surround sound mixing room utilizes commercially available acoustic panels and bass traps. A comparable setup could be adapted for a home theater, typically incorporating more diffusion and positioning the listening area and speakers closer to the back of the room.
A 7.1 surround sound control room designed for critical listening employs broadband bass absorption systems built into the walls, resembling giant DIY bass traps. There are two versions of this setup available: one with a purely absorptive rear wall (ideal for critical listening) and another with a rear wall diffuser (to introduce a bit more liveliness into the space). Example C is tailored for mixing surround sound music, although a comparable setup could also be employed for film post-production and surround media mastering.
If you need any advise because your rom is shaped diffrently and you don't know where to start, Then you are more then welcome to contact us and we can see if we can advise you and help you out!
Tip 3
Installing bass traps in corners helps to absorb low-frequency buildup and create a more balanced sound in your workspace.
Tip 2
Remember, the goal is not just to have adequate lighting on your video's, but to create a visually appealing and professional-looking mobile setup that complements your content. Continuously evaluate and refine your lighting techniques to improve the quality of your videos.
Basic Three-point light setup for your workspace
Below you see the basic three points light setup. For this you need three diffrent lights. A Keylight, a Fill light, and a Backlight. In this example we placed the camera directly infront of the subject. If you put your camera on a angle, or use multible camera's. Then you need a diffrent setup.
The key light serves as the primary source, angled down towards the subject from about 5 degrees around from the camera. Meanwhile, the fill light is positioned opposite the key light, reducing harsh shadows caused by it, with an intensity set at one-quarter to half, also directed towards the subject. Finally, the backlight, placed opposite the key light, separates the subject from the background by creating a subtle glowing effect along one side of the subject.
The keylight should be in such a hight that it can angle on a 45° angle downwards on you. This should have the brightest setting on. The fill light should have a medium intensity, in between 50% till maximum 75%. This also needs a anle of 45° angle downwards. Finaly the Backlight should be on a low intensity with a maximum of 35%. This can also be on a 45° angle downwards.

The backlight is not a must in this setup and many will skip this because for the Backlight you need some extra equipment namely a diffuser or softbox. Also make sure the backlight is out of sight of your camera.
Alternatively you can experiment by using a ring-led light on your camera as well. This will function as a second key light but if it overlights your video stream the the best option is stil the key light it self in this.
Daylight is your friend
So we have extra advice for you. If you are recording or streaming during the day time the use the natural daylight coming in your window(s).
However, make sure the light (sun) never is pointed directly in to the camera. Instead the natural light should be directed at you.
So the camera and the sunlight point in the same direction towards you.
Natural light is almost always better then using artificial light.


